![]()
KNOVADA EMERGENCY OPERATIONS CENTER SYSTEM
EMERGENCY OPERATIONS CENTER OVERVIEW
EOC INCIDENT LOCATION ADMINISTRATION
UPDATING EOC INCIDENT LOCATIONS
DELETING EOC INCIDENT LOCATIONS
EOC INCIDENT PRIORITY ADMINISTRATION
ADDING EOC INCIDENT PRIORITIES
UPDATING EOC INCIDENT PRIORITIES
DELETING EOC INCIDENT PRIORITIES
EOC INCIDENT IMPACT ADMINISTRATION
EOC INCIDENT RESPONSE LEVEL ADMINISTRATION
ADDING EOC INCIDENT RESPONSE LEVELS
UPDATING EOC INCIDENT RESPONSE LEVELS
DELETING EOC INCIDENT RESPONSE LEVELS
EOC INCIDENT URGENCY ADMINISTRATION
UPDATING EOC INCIDENT URGENCIES
DELETING EOC INCIDENT URGENCIES
EOC INCIDENT STATUS ADMINISTRATION
EOC INCIDENT CATEGORY ADMINISTRATION
ADDING EOC INCIDENT CATEGORIES
UPDATING EOC INCIDENT CATEGORIES
DELETING EOC INCIDENT CATEGORIES
EOC INCIDENT NOTIFICATION ADMINISTRATION
ADDING EOC INCIDENT NOTIFICATIONS
UPDATING EOC INCIDENT NOTIFICATIONS
DELETING EOC INCIDENT NOTIFICATIONS
VIEWING EOC INCIDENT ACTION DETAILS
CREATING AN EOC INCIDENT REPORT
ADMINISTRATION OPEN NEW EOC INCIDENT
DISASTER PLAN BUDGET STATUS ADMINISTRATION
ADDING DISASTER PLAN BUDGET STATUS
UPDATING DISASTER PLAN BUDGET STATUS
DELETING DISASTER PLAN BUDGET STATUS
DISASTER PLAN STATUS ADMINISTRATION
DISASTER PLAN PRIORITY ADMINISTRATION
ADDING DISASTER PLAN PRIORITIES
UPDATING DISASTER PLAN PRIORITIES
DELETING DISASTER PLAN PRIORITIES
MANAGING DISASTER PLAN PROJECTS ASSETS
MANAGING DISASTER PLAN PROJECTS INVENTORY
MANAGING DISASTER PLAN PROJECTS KEY PERSONNEL
EMERGENCY OPERATIONS CENTER OVERVIEW
Natural disaster recovery requires its own type of planning, since natural disaster scenarios can involve unpredictable circumstances unlike man-made disasters caused by malicious or accidental incidents such human error or nature. Disaster recovery planning may differ by region, and locations prone to flooding and other natural disasters may take such occurrences into account from the start. However, even if severe weather events aren't a frequent occurrence in your region, you should still consider them when crafting a natural disaster recovery plan.
Why natural disaster recovery preparedness is important
Natural hazards like hurricanes and floods vary in severity, but when it comes to disaster preparedness, it's best to prepare for the worst. If a location is prone to a certain type of natural disaster, working that disaster into the DR planning process is imperative. For example, if one location is in a known flood zone, the system can be used for a swift and focused recovery and once recovery is underway, disaster mitigation steps can be started to address this disaster.
The Knovada Emergency Operations Center software facilitate an identification and conversation to resolve public service issues by automating disaster management, proper disaster routing, reporting, centralized data collection, and FAQ database and resolution. Incidences can be escalated if problem is not resolved in the user defined time frame. The software also provides instructions on how to contact various agencies and allows for Incidences to become part of the knowledge based frequently asked questions. Our Emergency Operations Center software automates tasks such as: Disaster categorization and prioritization, disaster routing, alerts and notifications, disaster status management, and more. With our Emergency Operations Center solution reduces workload which provides for a better user experience. The main features include:
· Integrated mapping technology allows you to view incidences for specific dates on a map with the ability to drill down and get the details of each disaster. The mapping technology provides static street views of a geographic location. Additionally, you can display building locations and the most recent personnel check in times and location.
· Our technology provides the ability to gather the personnel device GEO location information and GEO location information from the image that can be uploaded when reporting a disaster.
· Mobile Capability - Access our system from any Smartphone or tablet. No shrunken screen, get a unique, purpose-built mobile experience for each solution and put the full power of the system in the hands of every user.
· With workflow support, touch points, and Disaster organization, our system is designed to help organizations more quickly address disasters while keeping the necessary personnel in the loop. Built-in incident disaster stats and reports can also help provide performance insights, so you can ensure your team is providing excellent service.
· Better Understand Risks - View the reports you need to protect the public at the click of a button. Get a better understanding of your risks by viewing disasters and relationships across any dimension.
· Highly Configurable - Yes and No field display selection configuration allows administrators to create forms and without field limitations on employee/disaster reports to capture the most accurate data possible.
· Identify Trends and Relationships - Quickly identify trends between disasters, locations, or assets involved in disasters. Perform root cause analysis to determine contributing factors and failed controls. Root cause analysis helps you identify gaps in existing processes, policies or countermeasures that need to be addressed.
· Single Sign On (SSO) - Ensure a seamless experience with single sign-on capabilities. Users require a single set of credentials in order to access all areas of their system.
· Once disaster data has been collected, you can now start to build projects to proactively address the disasters to prepare, respond, recover, and to mitigate them from reoccurring using our project management system software. When integrated with the Emergency Operations Center system, our project management system can used to assist in all phases of the disaster from identification, preparedness, response, recovery, and mitigation.
· Our emergency operations center disaster plan management system provides you the ability to build disaster plans that will be used to manage various phases of the disaster and to facilitate an effective and efficient methodology to manage the disaster.
· Disaster plan administrators are able to add, update, and delete disaster plans, disaster plan budget status, disaster plan status, disaster plan priorities, and disaster plan projects for each phase of the disaster.
· The disaster plan is integrated with the project management, asset management , and inventory control systems which allows you to develop a very detailed disaster plan for the preparedness, response, recover, and mitigation phases of the disaster. This provides you the ability to assign assets, inventory, and key personnel that will be required for each aspect of the disaster plan.
From the main administration menu of the Emergency Operation Center System, the organization has the ability to add, update, and delete incident locations incident priorities, incident impacts, incident urgencies, incident statuses, and incident notifications. Administrators can also navigate back to the emergency operation center dashboard. We will now discuss how to manage incident location information. The incident location feature allows administrators to add, update, and delete incident location information.
To access the Emergency Operation Center System, you would login to the Emergency Operation Center website which Knovada has created at the time of system implementation. Knovada will likewise collaborate with the organization’s staff to designate those personnel within the organization who will serve in the roles of Emergency Operation Center Operator, Emergency Operation Center Administrator, Emergency Operation Center Building Manager, Emergency Operation Center District Manager, Emergency Operation Center City Manager, Emergency Operation Center State Manager, Emergency Operation Center Region Manager, Emergency Operation Center Country Manager which would include the login information to access the system.
The roles are used to determine what information the employee can view such as buildings, districts, cities, states, regions, and countries. The roles also determine if they have access to the reports and administration functions within the system. The roles are also used in the incident mapping and personnel mapping reports. Based upon the role of the user will determine what level of data will be displayed in the reports. For example, if the user is defined as an Emergency Operation Center City Manager then they will only be able to see incidences, buildings and personnel that are within their city boundaries. Roles are designated when performing the employee administration functions which are discussed in detail in the Human Resource Management System Administration manual.
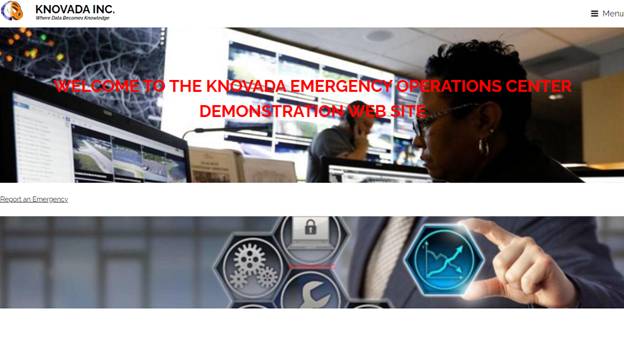
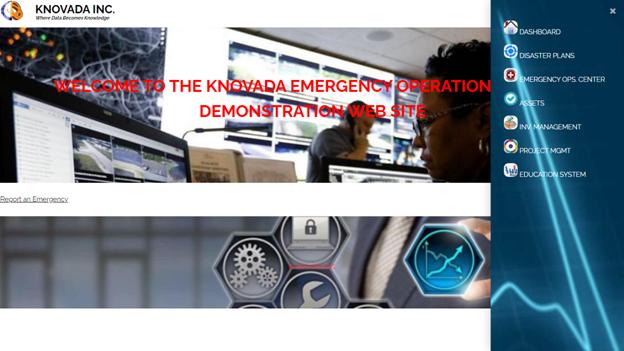
The system provides for the ability to allow the public to report emergencies which will be discussed later. We will now discuss how to access the Emergency Operation Center administrative features. Click on the Menu screen in the upper right-hand corner of the screen and the following screen is displayed.
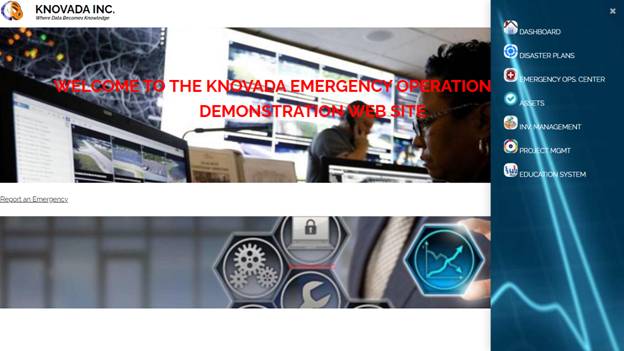
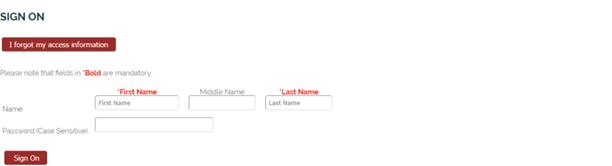
Select Emergency Ops. Center from the main menu which will navigate you to the Sign on Screen.
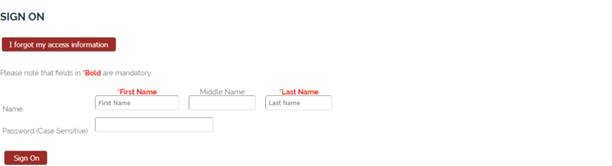
The employee would enter their login information and sign onto the system which would display the emergency operation center dashboard.
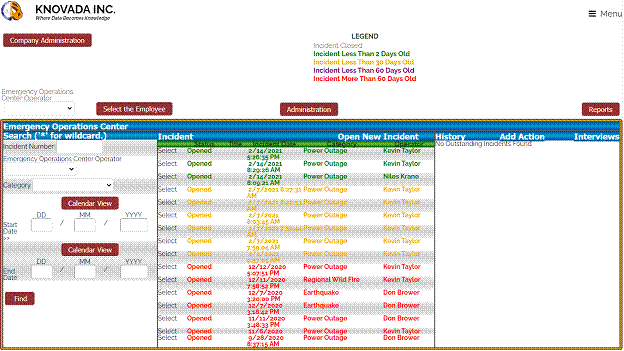
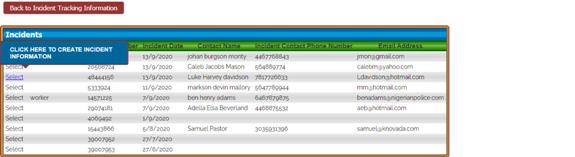
From the dashboard you can search incidences, view your outstanding incidences, open an incident, view your action items, open a new action item, add incident locations, update incident locations, manage interviews, and view reports. The emergency operation center system functions are available based upon the roles that the used has been assigned when adding or updating their employee information. You will notice that the incidences are in different colors based upon how long they have been opened. There is also an administration button that allows you to perform necessary administrative functions. We will now discuss the administration capabilities which are accessed by clicking on the administration button on the dashboard.
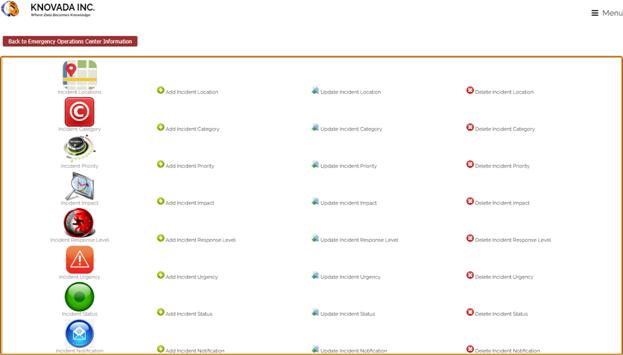
This screen shows how administrators are able to add, update, and delete incident locations, incident priorities, incident response levels, incident impacts, incident urgencies, incident statuses, and incident notifications. Administrators can also navigate back to the emergency operation center dashboard. Before incidences can be added to the Emergency Operation Center system, you will first need to add incident locations, incident priorities, incident response levels, incident impacts, incident urgencies, incident statuses, and incident notifications.
EOC INCIDENT LOCATION ADMINISTRATION
From the Emergency Operation Center Administration Main Menu, you can Add, Update and Delete Location Information. Incident locations are used when people report incidences to assist the organization in identifying locations that are considered to be locations of concern.
ADDING EOC INCIDENT LOCATIONS
Clicking on the Add Incident Location from the main menu will display this screen in which you would enter a location city, state, select if this is the capital, country, longitude and latitude information.

You will add a new location city entitled New City. You will also be required to select and fill all other required fields.

Select Add Incident Location Information and the following confirmation screen are displayed.
![]()
UPDATING EOC INCIDENT LOCATIONS
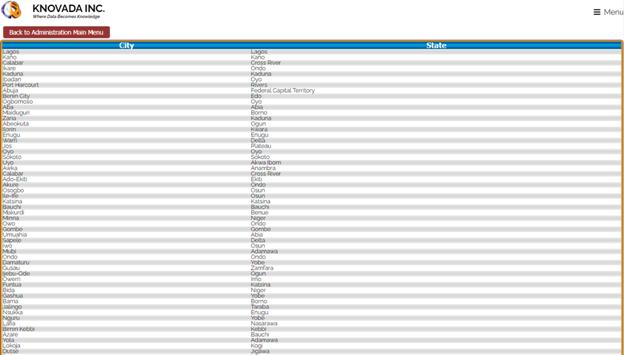
By clicking on the Update Incident Location Incident Location From the main menu, this screen will appear that displays the fields that can be used to search for locations.

You will be required to enter the city and state. You can use “*” for wildcard when searching. Once you have entered the city and state, you will click on the Update Location Information button and the following screen will be displayed.
You can click on a location and the following screen will be displayed which will allow you to view and update the incident location details. In our example we will select Lagos.

Select Update Incident Location Information and a confirmation screen are displayed.
![]()
DELETING EOC INCIDENT LOCATIONS
Should the organization wish to delete an incident location, select Delete Incident Location From the main menu.
Selecting Delete Incident Location will display the following screen.

You will be required to enter the city and state. You can use “*” for wildcard when searching. Once you have entered the city and state, you will click on the Delete Location Information button and the following screen will be displayed.
When you select a location from the screen above and the following screen is displayed.

To confirm the deletion of the incident locations, select YES. You will then receive a confirmation screen informing you that you have deleted the location.
EOC INCIDENT PRIORITY ADMINISTRATION
From the Emergency Operation Center Administration Main Menu, you can Add, Update and Delete Priority Information. Incident priorities are used when people report incidences to assist the organization in identifying incidences which will assist in determining which incidences require immediate attention.
ADDING EOC INCIDENT PRIORITIES
Clicking on the Add Incident Priority from the main menu will display this screen in which you would enter a priority and description information.

You will add a new priority and priority description.

Select Add Incident Priority Information and the following confirmation screen are displayed.
![]()
UPDATING EOC INCIDENT PRIORITIES
By clicking on the Update Incident Priority From the main menu, this screen will appear that displays the fields that can be used to search for priorities. There are two priorities that can not be updated which are High and critical priorities. The priorities are used when determining the email priority when sending out incident information to appropriate personnel.

You will be required to enter the priority. You can use “*” for wildcard when searching. Once you have entered the priority, you will click on the Update Priority Information button and the following screen will be displayed.
![]()
You can click on a priority and the following screen will be displayed which will allow you to view and update the incident priority details. In our example we will select Really Serious.

Select Update Incident Priority Information and a confirmation screen are displayed.
![]()
DELETING EOC INCIDENT PRIORITIES
Should the organization wish to delete an incident priority, select Delete Incident Priority From the main menu. Please note that you can only delete priorities that are not being referenced in the system. There are two priorities that can not be deleted which are High and critical priorities. The priorities are used when determining the email priority when sending out incident information to appropriate personnel.
Selecting Delete Incident Priority will display the following screen.

You will be required to enter the priority. You can use “*” for wildcard when searching. Once you have entered the priority, you will click on the Delete Priority Information button and the following screen will be displayed.
![]()
When you select a priority from the screen above and the following screen is displayed.

To confirm the deletion of the incident priorities, select YES. You will then receive a confirmation screen displayed below informing you that you have deleted the priority.
![]()
EOC INCIDENT IMPACT ADMINISTRATION
From the Emergency Operation Center Administration Main Menu, you can Add, Update and Delete Impact Information. Incident impacts are used when people report incidences to assist the organization in identifying incidences which will assist in determining which incidences require immediate attention.
ADDING EOC INCIDENT IMPACTS
Clicking on the Add Incident Impact from the main menu will display this screen in which you would enter an impact and description information.

You will add a new impact and impact description.

Select Add Incident Impact Information and the following confirmation screen are displayed.
![]()
UPDATING EOC INCIDENT IMPACTS
By clicking on the Update Incident Impact from the main menu, this screen will appear that displays the fields that can be used to search for impacts.

You will be required to enter the impact. You can use “*” for wildcard when searching. Once you have entered the impact, you will click on the Update Impact Information button and the following screen will be displayed.
![]()
You can click on an impact and the following screen will be displayed which will allow you to view and update the incident impact details. In our example we will select Huge Impact.

Select Update Incident Impact Information and a confirmation screen are displayed.
![]()
DELETING EOC INCIDENT IMPACTS
Should the organization wish to delete an incident impacts, select Delete Incident Impact from the main menu. Please note that you can only delete impacts that are not being referenced in the system.
Selecting Delete Incident Impact will display the following screen.

You will be required to enter the impact. You can use “*” for wildcard when searching. Once you have entered the impact, you will click on the Delete Impact Information button and the following screen will be displayed.
![]()
When you select an impact from the screen above and the following screen is displayed.

To confirm the deletion of the incident impacts, select YES. You will then receive a confirmation screen displayed below informing you that you have deleted the impact.
![]()
EOC INCIDENT RESPONSE LEVEL ADMINISTRATION
From the Emergency Operation Center Administration Main Menu, you can Add, Update and Delete Response Level Information. Incident response levels are used when people report incidences to assist the organization in identifying incidences which will assist in determining which incidences require immediate attention.
ADDING EOC INCIDENT RESPONSE LEVELS
Clicking on the Add Incident Response Level from the main menu will display this screen in which you would enter response level and description information.

You will add a new response level and response level description. Select Add Incident Response Level Information and the following confirmation screen are displayed.
![]()
UPDATING EOC INCIDENT RESPONSE LEVELS
By clicking on the Update Incident Response Level from the main menu, this screen will appear that displays the fields that can be used to search for response levels.

You will be required to enter the response level. You can use “*” for wildcard when searching. Once you have entered the response level, you will click on the Update Response Level Information button and the following screen will be displayed.

You can click on a response level and the following screen will be displayed which will allow you to view and update the incident response level details. In our example we will select new Response Level.

Select Update Incident Response Level Information and a confirmation screen are displayed.
![]()
DELETING EOC INCIDENT RESPONSE LEVELS
Should the organization wish to delete an incident response levels, select Delete Incident Response Level from the main menu. Please note that you can only delete response levels that are not being referenced in the system.
Selecting Delete Incident Response Level will display the following screen.

You will be required to enter the response level. You can use “*” for wildcard when searching. Once you have entered the response level, you will click on the Delete Response Level Information button and the following screen will be displayed.

When you select a response level from the screen above and the following screen is displayed.

To confirm the deletion of the incident response levels, select YES. You will then receive a confirmation screen displayed below informing you that you have deleted the response level.
![]()
EOC INCIDENT URGENCY ADMINISTRATION
From the Emergency Operation Center Administration Main Menu, you can Add, Update and Delete Urgency Information. Incident urgencies are used when people report incidences to assist the organization in identifying incidences which will assist in determining which incidences require immediate attention.
ADDING EOC INCIDENT URGENCIES
Clicking on the Add Incident Urgency from the main menu will display this screen in which you would enter urgency and description information.

You will add a new urgency and urgency description.

Select Add Incident Urgency Information and the following confirmation screen are displayed.
![]()
UPDATING EOC INCIDENT URGENCIES
By clicking on the Update Incident Urgency from the main menu, this screen will appear that displays the fields that can be used to search for urgencies.

You will be required to enter the urgency. You can use “*” for wildcard when searching. Once you have entered the urgency, you will click on the Update Urgency Information button and the following screen will be displayed.

You can click on an urgency and the following screen will be displayed which will allow you to view and update the incident urgency details. In our example we will select Really Urgent.

Select Update Incident Urgency Information and a confirmation screen are displayed.
![]()
DELETING EOC INCIDENT URGENCIES
Should the organization wish to delete incident urgencies, select Delete Incident Urgency from the main menu. Please note that you can only delete urgencies that are not being referenced in the system.
Selecting Delete Incident Urgency will display the following screen.

You will be required to enter the urgency. You can use “*” for wildcard when searching. Once you have entered the urgency, you will click on the Delete Urgency Information button and the following screen will be displayed.

When you select urgency from the screen above and the following screen is displayed.

To confirm the deletion of the incident urgencies, select YES. You will then receive a confirmation screen displayed below informing you that you have deleted the urgency.
![]()
EOC INCIDENT STATUS ADMINISTRATION
From the Emergency Operation Center Administration Main Menu, you can Add, Update and Delete Status Information. Incident status are used when people report incidences to assist the organization in identifying incidences which will assist in determining which incidences require immediate attention.
ADDING EOC INCIDENT STATUS
Clicking on the Add Incident Status from the main menu will display this screen in which you would enter a status and description information.

You will add a new status and status description.

Select Add Incident Status Information and the following confirmation screen are displayed.
![]()
UPDATING EOC INCIDENT STATUS
By clicking on the Update Incident Status from the main menu, this screen will appear that displays the fields that can be used to search for status.

You will be required to enter the status. You can use “*” for wildcard when searching. Once you have entered the status, you will click on the Update Status Information button and the following screen will be displayed.
![]()
You can click on a status and the following screen will be displayed which will allow you to view and update the incident status details. In our example we will select Urgently Waiting.

Select Update Incident Status Information and a confirmation screen are displayed.
![]()
DELETING EOC INCIDENT STATUS
Should the organization wish to delete an incident status, select Delete Incident Status From the main menu. Please note that you can only delete statuses that are not being referenced in the system.
Selecting Delete Incident Status will display the following screen.

You will be required to enter the status. You can use “*” for wildcard when searching. Once you have entered the status, you will click on the Delete Status Information button and the following screen will be displayed.
![]()
When you select a status from the screen above and the following screen is displayed.

To confirm the deletion of the incident status, select YES. You will then receive a confirmation screen displayed below informing you that you have deleted the status.
![]()
EOC INCIDENT CATEGORY ADMINISTRATION
From the Emergency Operation Center Administration Main Menu, you can Add, Update and Delete Category Information. Incident categories are used to determine what fields will be displayed when reporting an incident. Additionally, you can set a default status, priority, urgency and impact.
ADDING EOC INCIDENT CATEGORIES
Clicking on the Add Incident Category from the main menu will display this screen in which you would enter category information. Before adding categories you must first add status, priority, urgency and impact information.
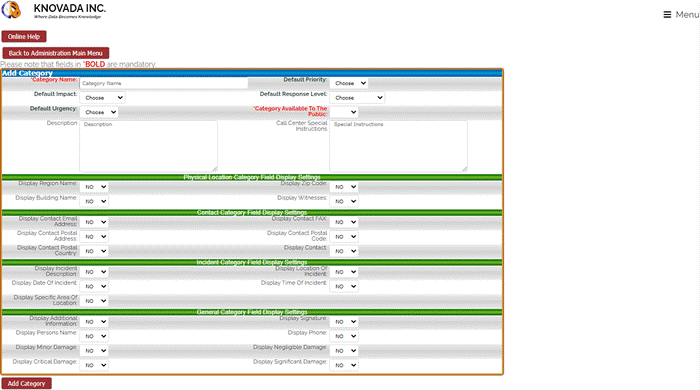
This screen displays some of the available fields that can be used to generate the incident category form. You would enter the category name and description and you can set the default priority, impact, response level, and urgency for the incident category and determine is this category will be visible to the public when they are reporting an incident. You then select yes to the fields that you want to be displayed when the incident category form is being filled out.
Select Add Incident Category Information and the following confirmation screen are displayed.
![]()
UPDATING EOC INCIDENT CATEGORIES
By clicking on the Update Incident Category from the main menu, this screen will appear that displays the fields that can be used to update the category.

You will be required to enter the category. You can use “*” for wildcard when searching. Once you have entered the category, you will click on the Update Category Information button and the following screen will be displayed.
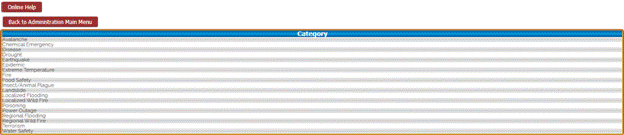
You can click on a category and the following screen will be displayed which will allow you to view and update the incident category details. In our example we will select chemical emergency.

Select Update Incident Category Information and a confirmation screen are displayed.
![]()
DELETING EOC INCIDENT CATEGORIES
Should the organization wish to delete an incident category, select Delete Incident Category From the main menu. Please note that you can only delete categories that are not being referenced in the system.
Selecting Delete Incident Category will display the following screen.

You will be required to enter the category. You can use “*” for wildcard when searching. Once you have entered the category, you will click on the Delete Category Information button and the following screen will be displayed.
When you select a category from the screen above and the following screen is displayed.

To confirm the deletion of the incident category, select YES. You will then receive a confirmation screen displayed below informing you that you have deleted the category.
![]()
EOC INCIDENT NOTIFICATION ADMINISTRATION
From the Emergency Operation Center Administration Main Menu, you can Add, Update and Delete Notification Information. Incident notifications are used to determine who will be notified when an incident is entered based upon the location and category of the incident. This feature allows you to build a very specific notification system to ensure that information is being sent to the appropriate personnel or departments.
ADDING EOC INCIDENT NOTIFICATIONS
Clicking on the Add Incident Notification from the main menu will display this screen in which you would enter notification information. Before adding notifications you must add category and location information.
![]()
This screen displays the pull down list of the locations that have been entered into the system. Once you select the location click on the Add Notification Information button.
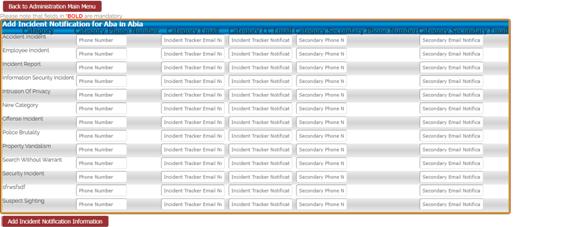
This screen allows you to determine who will be notified for each category in each location identified in the system. This example shows the notification information Aba in Abia. For each category you can included a phone number, the primary email address or addresses and the email address or addresses that will receive a carbon copy of the email. You can also designate a secondary contact phone number and email address or address. The email notification occurs automatically when an incident is entered into the system. This allows you to build a very specific notification system to ensure that information is being sent to the appropriate personnel or departments. Once you have filled in all of the necessary information, select Add Incident Notification Information and the following confirmation screen is displayed.
![]()
UPDATING EOC INCIDENT NOTIFICATIONS
By clicking on the Update Incident Notification from the main menu, this screen will appear that displays the fields that can be used to update the notification.
![]()
You will be required to select a location. Once you have select a location, you will click on the Update Notification Information button and the following screen will be displayed.
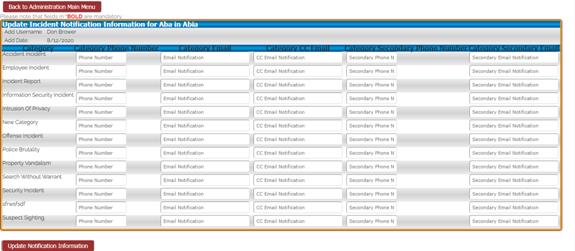
This screen allows you to update who will be notified for each category in each location identified in the system. This example shows the notification information Aba in Abia. For each category you can included a phone number, the primary email address or addresses and the email address or addresses that will receive a carbon copy of the email. You can also designate a secondary contact phone number and email address or address. The email notification occurs automatically when an incident is entered into the system. This allows you to build a very specific notification system to ensure that information is being sent to the appropriate personnel or departments. Additionally, the person that added the notification information and the date they added the information is recorded in the system. If the notification information is updated, the person that updated the notification information will be displayed along with the date the information was updated. Once you have filled in all of the necessary information, select Add Incident Notification Information and the following confirmation screen is displayed.
![]()
DELETING EOC INCIDENT NOTIFICATIONS
Should the organization wish to delete an incident notification, select Delete Incident Notification from the main menu.
Selecting Delete Incident Notification will display the following screen.
![]()
You will be required to select a location. Once you have select a location, you will click on the Delete Notification Information button you will then receive a confirmation screen displayed below informing you that you have deleted the notification.
![]()
VIEWING EOC INCIDENT DETAILS
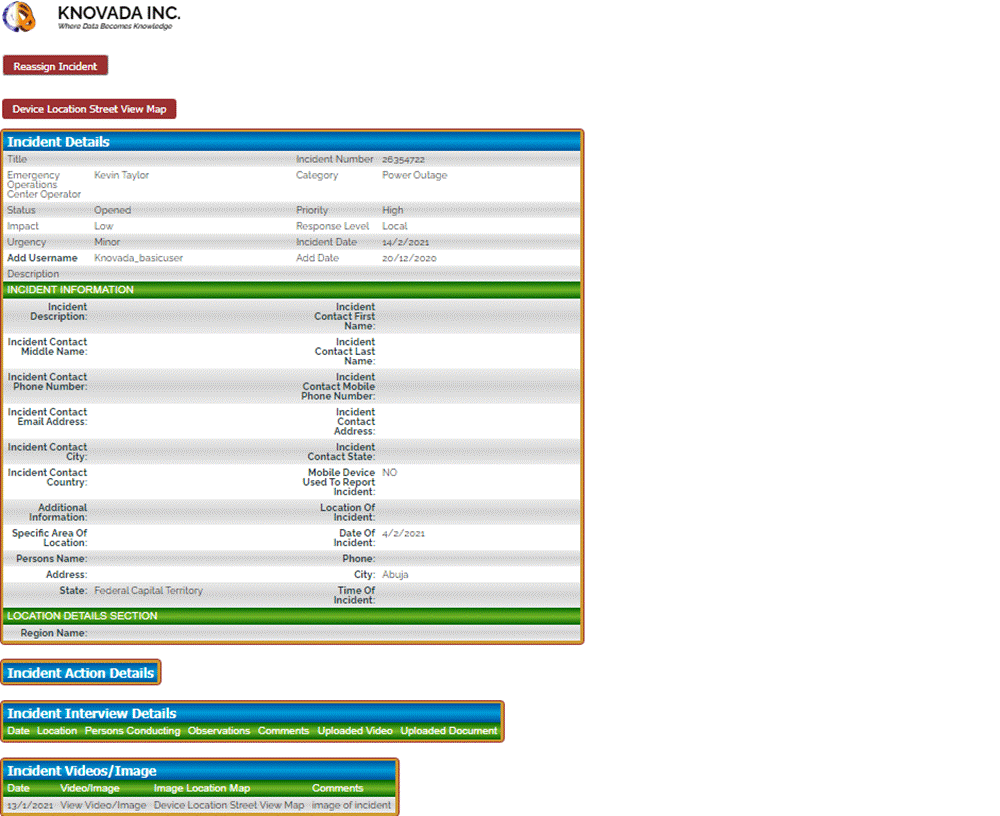
From the emergency operation center dashboard you can select click on an incident to view the incident details and the following screen will be displayed.
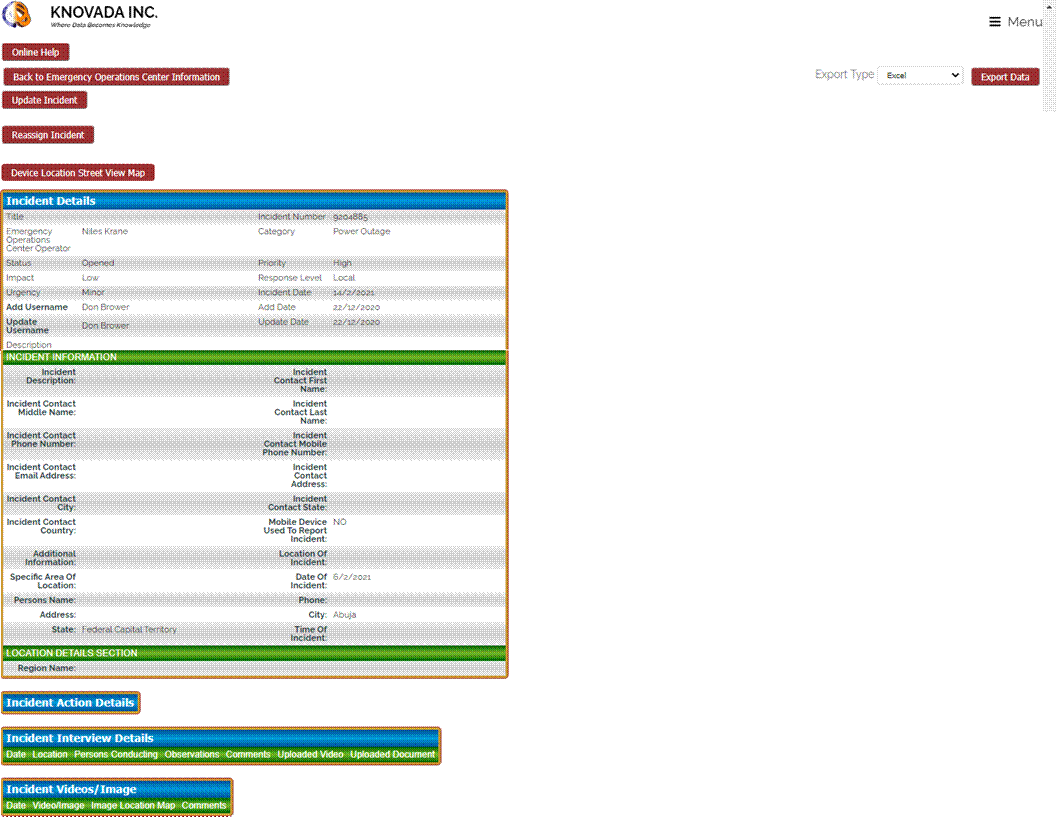
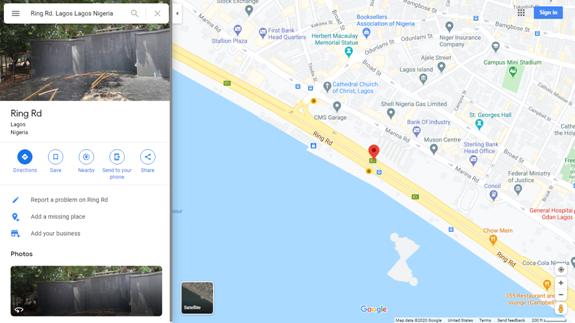
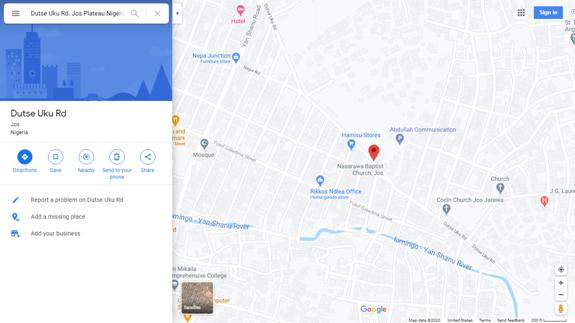
This screen provides you the incident information. You can also view associated videos and documents that have been uploaded regarding this incident. To view the videos or documents you just click on the view video/image or document link and a window will open and display the video/image or document. You can also click on the device location street view map button and the following page will be displayed.
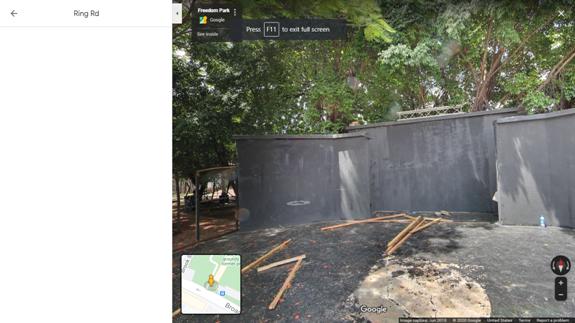
By clicking on the image in the upper left hand corner the following screen is displayed. Please note these are not real time screen captures
From the emergency operation center dashboard you can click on add action and the following screen will be displayed.
This screen allows searching for an incident. Once you have filled in the necessary fields you can click on the search for incident button and the following screen will be displayed.
From the previous screen you can click on an incident and
the following screen will be displayed.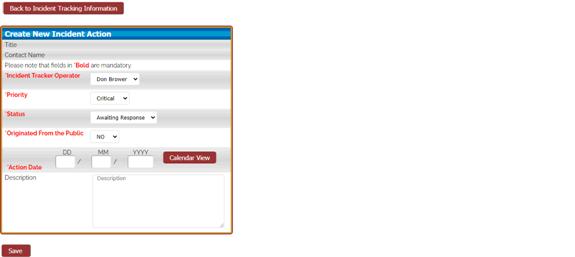
This screen allows you to enter necessary information regarding the action. Once you have filled in the necessary information, you click on save to add the new action.
ASSIGNING EOC INCIDENT
When an incident is entered by the public it will need to be assigned to an employee.
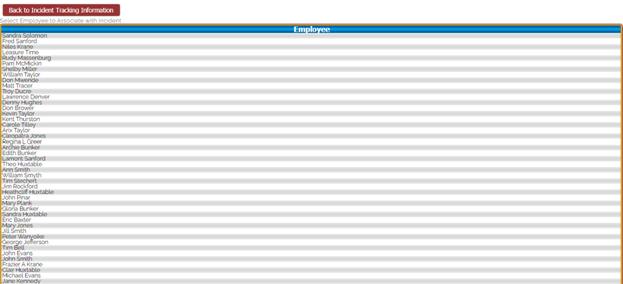
You will notice in the screen below the second assigned operator is “Not Assigned”. To assign this incident to an employee you will click on “Select” that is associated with the incident that has not been assigned. When you click the following screen is displayed.

The first step in assigning an incident is to search for an employee to assign to the incident. You can use “*” for a wildcard when performing the search. Once you have entered the desired information click on the Search for Employee button and the following screen will be displayed.
You can then click on an employee and the following screen will be displayed confirming that the incident has been updated.
![]()
ADD EOC INCIDENT ACTION
From the emergency operation center dashboard you can click on the Add Action to add an incident action.
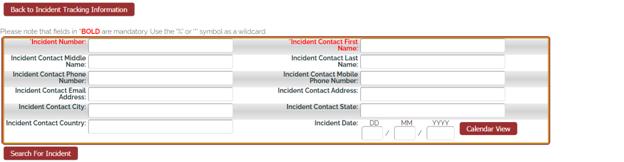
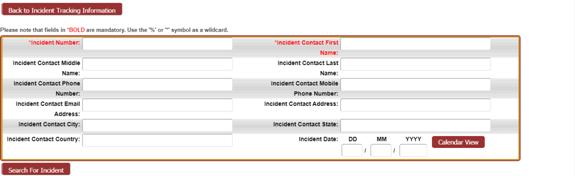
This screen allows you to enter the search criteria that will be used to search for incidences. You are required to enter the Incident Number and Incident Contact First Name. You can use “*” for wildcard. Once you have filled in the desired information click on the Search For Incident button and the following screen will be displayed.
From this screen you will select the incident you want to add an incident action. When you select an incident the following screen will be displayed.
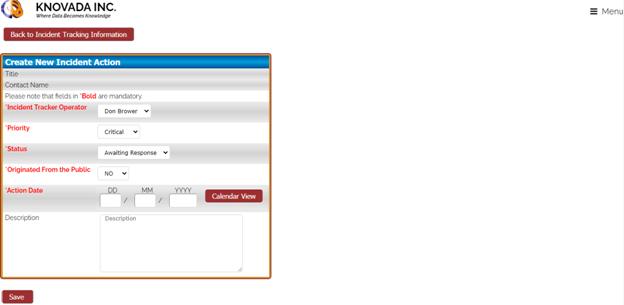
This screen allows you to assign an incident tracker operator, the priority, and status, select if the incident action has been originated from the public, and action date, and the action description. Once you have entered all of the required and desired information, click on save button to add the incident action. The screen below displays the confirmation that the incident action has been added.

VIEWING EOC INCIDENT ACTION DETAILS
From the emergency operation center dashboard you can click on the action item to display the action item details.
This screen displays the incident action details
EOC INCIDENT INTERVIEWS
From the emergency operation center dashboard you can click on interviews. The interviews feature allows you to document any interviews that were conducted during the investigation. By clicking on interviews the following screen will be displayed.

The first step is to enter incident date search criteria. Once you have completed entering the dates you will click on the submit selections button and the following screen will be displayed.

From this screen you will select the incident in which you want to associate an interview. Once you have selected an incident the following screen will be displayed.
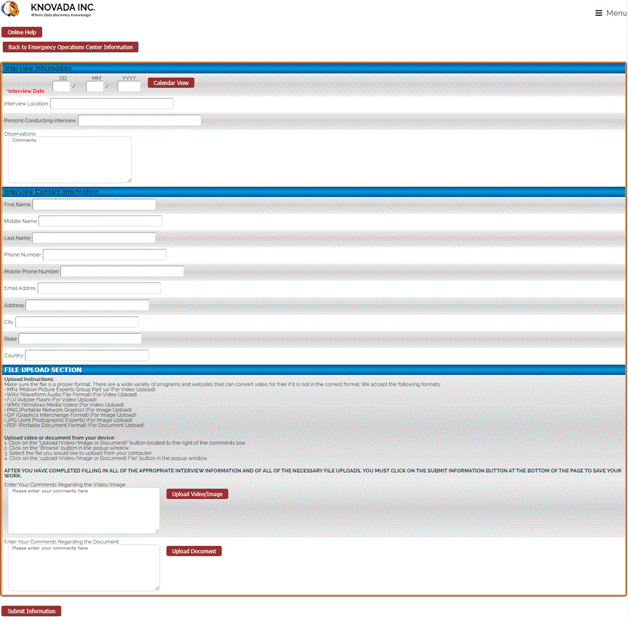
You can enter basic interview information, interview contact information, and there is the ability to upload an image and short video which can be viewed later in the investigation process.
EOC INCIDENT REPORTING
From the emergency operation center dashboard you can view reports by clicking on the reports button and the following screen will be displayed.

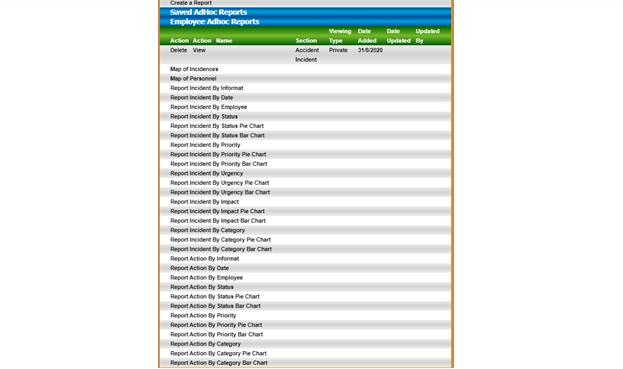
CREATING AN EOC INCIDENT REPORT
We will now discuss how to create a report. By clicking on
Create a Report the following screen will be displayed. 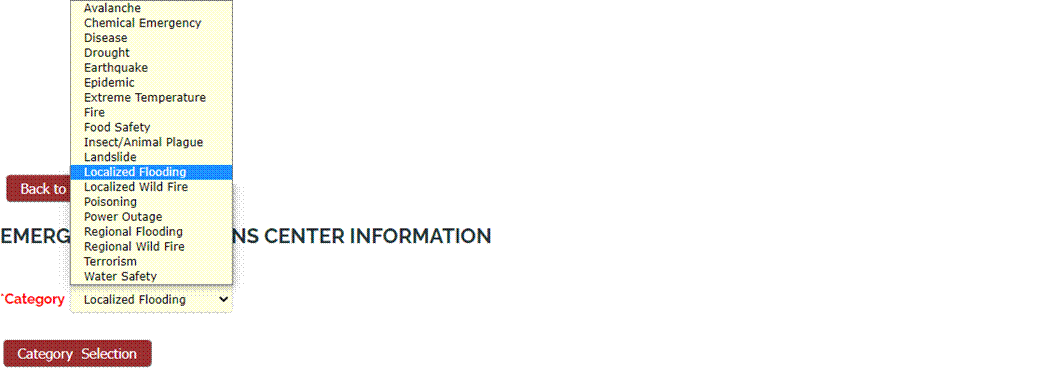
You first will select the incident category that will be
associated with this report. By selecting a category the report will
automatically display the appropriate fields for the report.
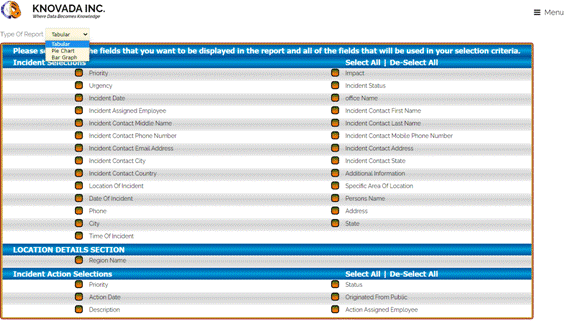
You can now select the type of report you want generated and the fields that will be displayed in the report.
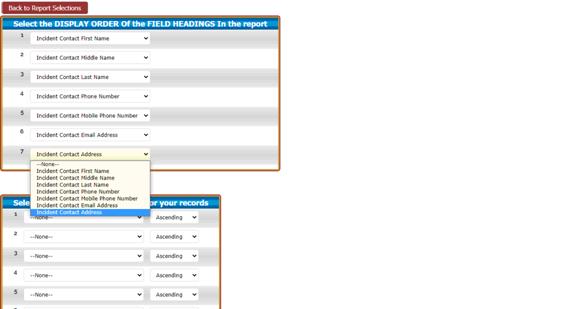
You can now select display order of the fields in the report. You can also select the sort order of the report fields.

Once you selected the display order and the sort fields you click on the Adhoc Report Selections button to generate the report.
.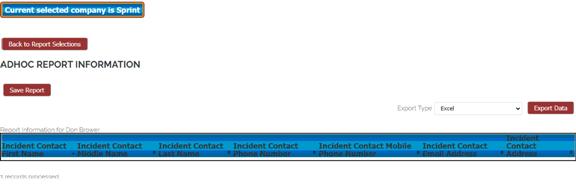
The report will be displayed using the information you provided to generate the report. If you would like you can also save the report, which will allow you to access the report in the future.
MAP OF EOC INCIDENCES REPORT
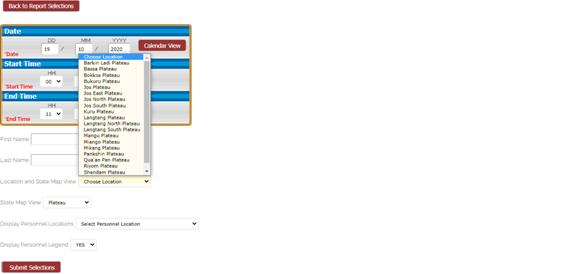
We will now discuss the Map of Incidences in the report main menu. By clicking on the Map of Incidences the following screen is displayed.
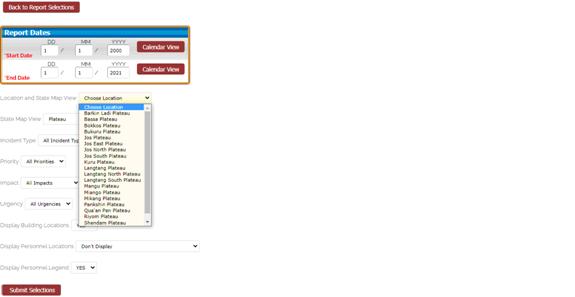
This screen allows you to enter the report dates and you can select the city, state region, incident type, priority, impact, urgency, display building locations, display personnel locations and personnel legend. We will choose to display personnel locations, the personnel legend and the following screen is displayed.
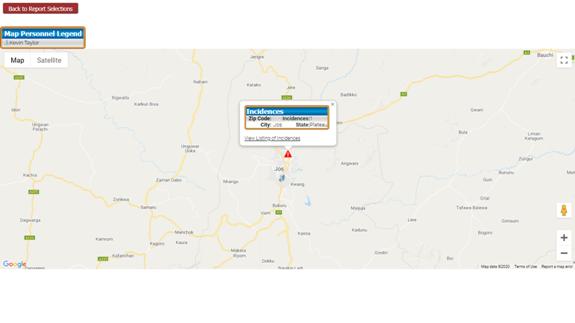
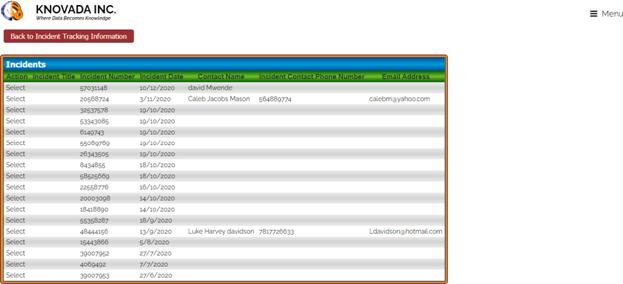
There are markers for incidences that occurred based on the search criteria previously provided. You can then click on a marker and you can view national information regarding the number of incidences that were found. You can also click on view listing of incidences and the following screen will be displayed.
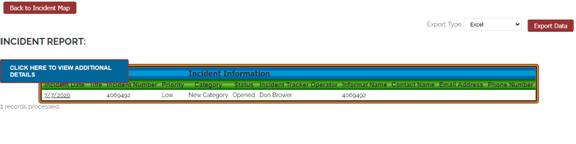
This screen will display all of the incidences that were
found. You can then click on an incident to view additional
details. You also have the ability to export the incident information and
to view a street map as displayed in the following screen.
MAP OF EOC PERSONNEL REPORT
We will now discuss the Map of Personnel in the report main menu. By clicking on the Map of Personnel the following screen is displayed.
This screen allows you to enter the report dates, first and last name, and you can select the city, state region, display personnel locations and personnel legend. We will choose to display the entire state view and the following screen is displayed.
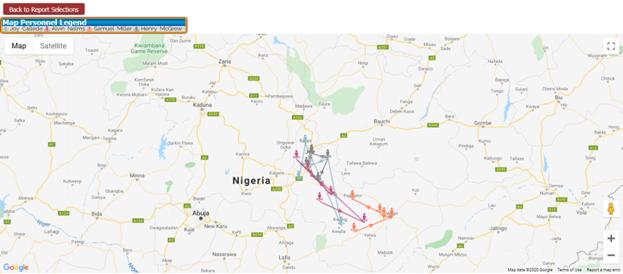
This map provides the locations of personnel based upon the locations and times in which they checked in. You will notice the different colors for each of the personnel displayed. Also, there is a line connecting the times in which they checked in and the line contains an arrow showing in which direction they traveled. When you mouse over one of the personnel locations the status, date and time is displayed.
EOC GEO LOCATION TRACKING
We will now discuss how the personnel location information
is collected. This feature will allow for the tracking of personnel and
provide the ability to very quickly identify their last know locations and
their movement through the selected times. A link can be added to their
mobile device as a shortcut and with one click they can enter their check in
information and status. The first time an employee goes to the GEO
Location they will be required to sign on. 
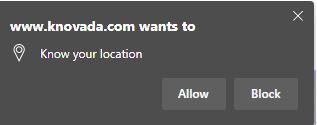
Once they have successfully signed on and allowed the system to capture their GEO location information they will not be required to sign on in the future when accessing the geo location check in link. The user would click on “allow” as displayed in the screen below and the system will record and store the latitude, longitude, and IPAddress as part of the geo location information.
In addition to the Geo location information the use will be required to select a check in status.
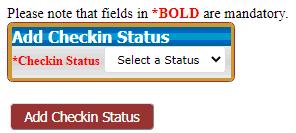
Once the employee has selected a check in status they will click on the Add Check in Status button and their GEO Location will be recorded in the system. This information will be used in the mapping reports.
ADMINISTRATION OPEN NEW EOC INCIDENT
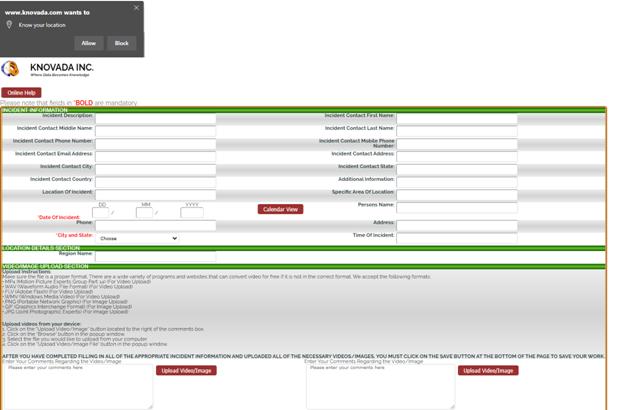
The Open New Incident on the administration web site works the same as it does for the public incident process in capturing of the incident information. This ensures consistency in the information that is captured for each incident category. The only difference is that the administration incident allows the user to override the default settings for priority, urgency, and impact as displayed in the following screen. From the Emergency Operation Center dashboard we will now discuss how to open a new incident.
From the Emergency Operation Center Dashboard the user would click on Open New Incident and the following screen would be displayed.

The following screen shows some of the fields of information that can be entered for an incident. This incident allows the user to override the default settings for priority, urgency, and impact as displayed in the following screen. Once they have selected a category and clicked on Select Type of Incident button the following screen will be displayed.
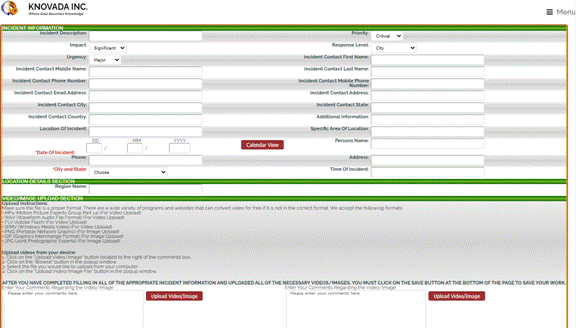
You can also upload images and videos that pertain to the incident. To upload a video you click on the upload video/Image button and the following screen is displayed. When uploading an image or video, if the person has turned on location in their camera settings on their mobile device, the system will record the location, device make and model, along with the date and time the image/video was taken from the image/video and stores the information as part of the incident. This allows a person to take a picture and then leave the location and upload the video at a later time. Since we will be recording the location, device make and model, along with the date and time information from the image/video the system will still be able to view the location of where the video/image was taken. Date and time information from the image/video the system will still be able to view the location of where the video/image was taken.
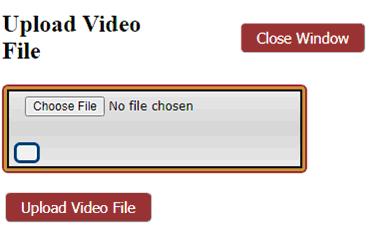
To continue the file upload process you click on choose file and the following screen is displayed.
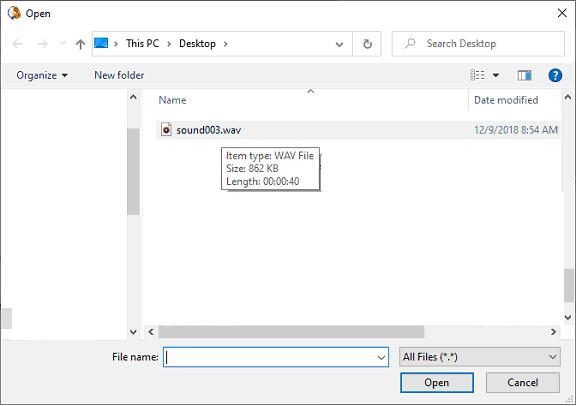
This screen will allow you to search your computer or mobile device and select a file to upload. Once you have selected the file you click on open and the following screen will be displayed.
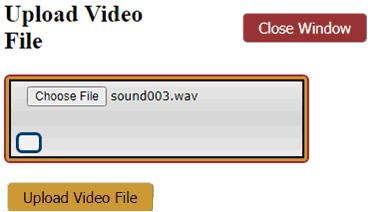
You now notice that the file you selected is displayed. To complete the upload process you click on the Upload Video File button. Once the upload is complete the following screen is displayed.
You will now notice that a new button is displayed, View Video/Image. If you want to view the file that has been uploaded to the system you click on this button and the following screen is displayed.
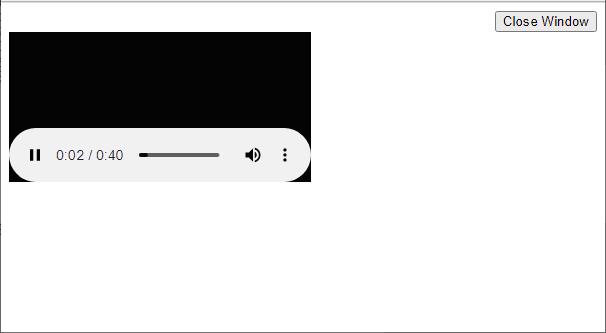
The video/audio file will start to play. Once you are done, you click on the close window button to return to the previous page.
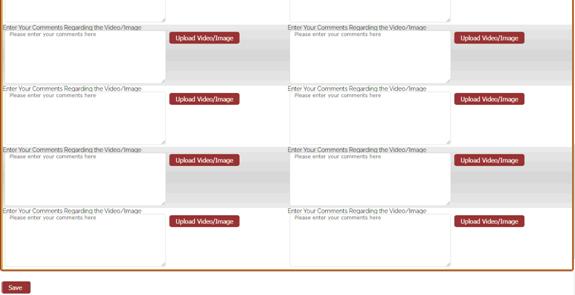
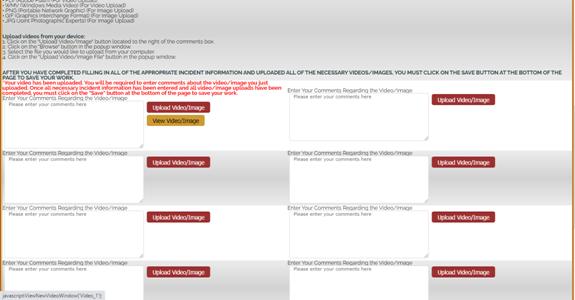
If you would like to upload more videos or images, you can click on another upload video/image button. Once you have completed the upload process you can now view the second file you have uploaded. Once you are done uploading files and filling in all of the necessary information, you click on the save to submit all of the information regarding this incident to the system.
The following screen is an example of the screen that will be displayed to the person that has entered the incident. You will notice that the person has the ability to send out a secondary email if necessary.
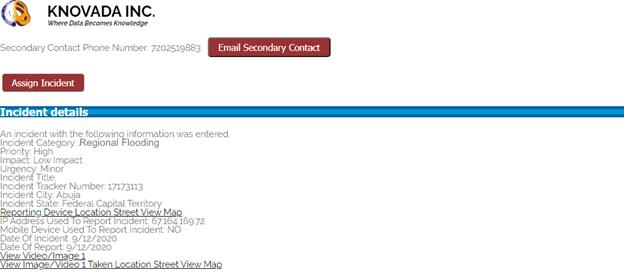
The following screen displays the information that the designated person would receive from the emergency operation center system when an incident has been entered. You will notice the person would have a number of links to allow them to quickly gather and review information pertaining to the incident such as a street view map, ability to view the image and a street view map of the location the video was taken.
PUBLIC OPEN NEW EOC INCIDENT
Incidences can be reported by the public if the system is configured to allow for public incident reporting. Based upon the incident categories that have been entered into the system, the person is required to select the type of incident they want to report. When the public reports an incident, the priority, urgency, response level, and impact use the default settings that were selected when the category was added to the system. Selecting the appropriate category will determine what information can be entered by the person when reporting the incident.
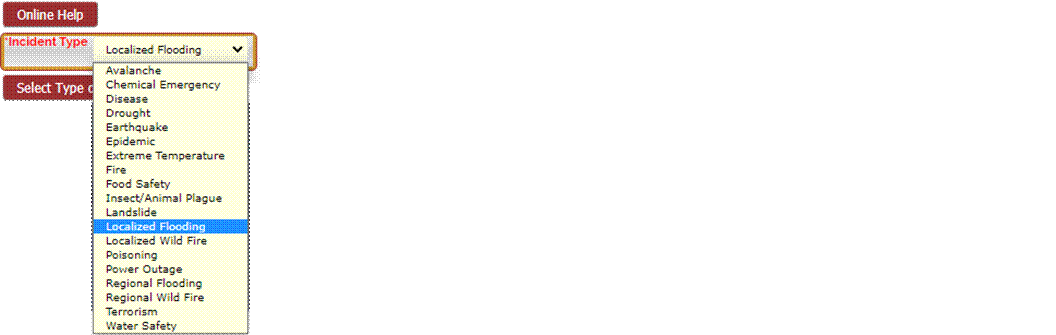
Once they have selected a category and clicked on Select Type of Incident button the following screen will be displayed. You will notice that the priority, urgency, response level, and impact can not be overridden.
This screen shows some of the fields of information that can be entered for an incident. You will also notice that the system is requesting that the user allow the system to capture their GEO location information. The user would click on allow and the system will record and store the latitude, longitude, and IPAddress as part of the incident information. The location information can be used to display their location when they entered in incident. For computers that do not have location information such as PC’s the IP address and location of the local network switching location will be stored. The person will only be asked this one time unless they choose to block the systems ability to record their location information. If the user allows the system to record their location information every time they enter an incident their location information will automatically be recorded. If they choose to block location information the next time the report an incident the system will display an alert message that they have blocked the systems ability to allow for recording of location information. They will be provided instructions on how to allow the system to record location information. The system will inform the organization that the person did not allow the system to record their location information. You can also upload images and videos that pertain to the incident. To upload a video you click on the upload video/Image button and the following screen is displayed. When uploading an image or video, if the person has turned on location in their camera settings on their mobile device, the system will record the location, device make and model, along with the date and time the image/video was taken from the image/video and stores the information as part of the incident. This allows a person to take a picture and then leave the location and upload the video at a later time. Since we will be recording the location, device make and model, along with the date and time information from the image/video the system will still be able to view the location of where the video/image was taken.
To continue the file upload process you click on choose file and the following screen is displayed.
This screen will allow you to search your computer or mobile device and select a file to upload. Once you have selected the file you click on open and the following screen will be displayed.
You now notice that the file you selected is displayed. To complete the upload process you click on the Upload Video File button. Once the upload is complete the following screen is displayed.
You will now notice that a new button is displayed, View Video/Image. If you want to view the file that has been uploaded to the system you click on this button and the following screen is displayed.
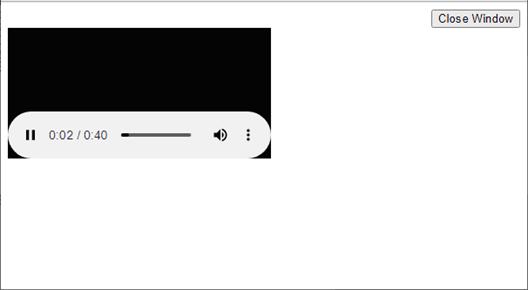
The video/audio file will start to play. Once you are done, you click on the close window button to return to the previous page.
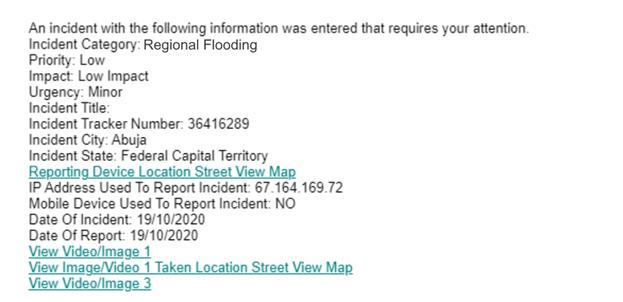
If you would like to upload more videos or images, you can click on another upload video/image button. Once you have completed the upload process you can now view the second file you have uploaded. Once you are done uploading files and filling in all of the necessary information, you click on the save to submit all of the information regarding this incident to the system. The following is an example of the information that will be displayed to the person when they have entered an incident.
![]()
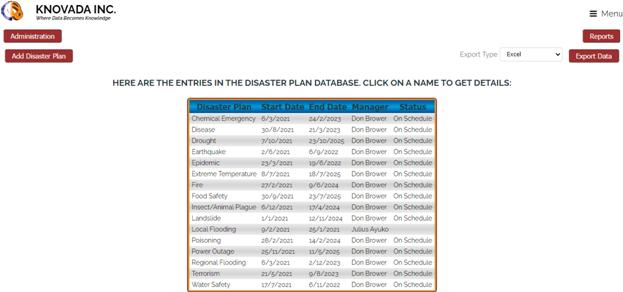
Select disaster plans from the main menu which will navigate to the Login Screen.
The employee would enter their login information and sign onto the system which would display the disaster plan dashboard.

From the dashboard you can add disaster plans, and click on a disaster plan to view the plan details. If you are not the disaster plan administrator but have access to projects that are part of disaster plans, the projects will be listed so that you can click on the project name to view the details. There is also an administration button that allows you to perform necessary administrative functions. We will now discuss the administration capabilities which are accessed by clicking on the administration button on the dashboard.
From the dashboard you can add disaster plans, and click on a disaster plan to view the plan details. There is also an administration button that allows you to perform necessary administrative functions. We will now discuss the administration capabilities which are accessed by clicking on the administration button on the dashboard.
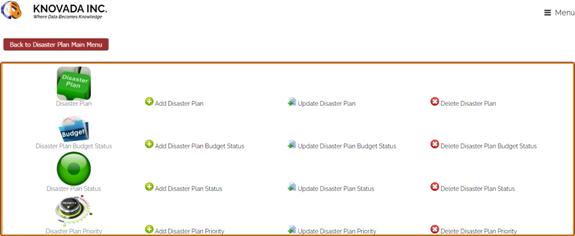
This screen shows how administrators are able to add, update, and delete disaster plans, disaster plan budget status, disaster plan status, and disaster plan priorities. Administrators can also navigate back to the disaster plan dashboard. Before disaster plans can be added to the Disaster Plan system, you will first need to add budget status, disaster plan status, and disaster plan priorities.
DISASTER PLAN BUDGET STATUS ADMINISTRATION
From the Disaster Plan Administration Main Menu you can Add, Update and Delete Budget Status Information. Disaster Plan budget status are used when people report incidences to assist the organization in identifying incidences which will assist in determining which incidences require immediate attention.
ADDING DISASTER PLAN BUDGET STATUS
Clicking on the Add Disaster Plan Budget Status from the main menu will display this screen in which you would enter budget status and description information.

You will add a new budget status and budget status description.

Select Add Disaster Plan Budget Status Information and the following confirmation screen are displayed.
![]()
UPDATING DISASTER PLAN BUDGET STATUS
By clicking on the Update Disaster Plan Budget Status from the main menu, this screen will appear that displays the fields that can be used to search for budget status.

You will be required to enter the budget status. You can use “*” for wildcard when searching. Once you have entered the budget status, you will click on the Update Budget Status Information button and the following screen will be displayed.

You can click on a budget status and the following screen will be displayed which will allow you to view and update the disaster plan budget status details. In our example we will select On Budget.

Select Update Disaster Plan Budget Status Information and a confirmation screen are displayed.
![]()
DELETING DISASTER PLAN BUDGET STATUS
Should the organization wish to delete a disaster plan budget status, select Delete Disaster Plan Budget Status From the main menu. Please note that you can only delete budget statuses that are not being referenced in the system.
Selecting Delete Disaster Plan Budget Status will display the following screen.

You will be required to enter the budget status. You can use “*” for wildcard when searching. Once you have entered the budget status, you will click on the Delete Budget Status Information button and the following screen will be displayed.

When you select a budget status from the screen above and the following screen is displayed.

To confirm the deletion of the disaster plan budget status, select YES. You will then receive a confirmation screen displayed below informing you that you have deleted the budget status.
![]()

DISASTER PLAN STATUS ADMINISTRATION
From the Disaster Plan Administration Main Menu, you can Add, Update and Delete Status Information. Disaster Plan status are used when people report incidences to assist the organization in identifying incidences which will assist in determining which incidences require immediate attention.
ADDING DISASTER PLAN STATUS
Clicking on the Add Disaster Plan Status from the main menu will display this screen in which you would enter a status and description information.

You will add a new status and status description.

Select Add Disaster Plan Status Information and the following confirmation screen are displayed.
![]()
UPDATING DISASTER PLAN STATUS
By clicking on the Update Disaster Plan Status from the main menu, this screen will appear that displays the fields that can be used to search for status.

You will be required to enter the status. You can use “*” for wildcard when searching. Once you have entered the status, you will click on the Update Status Information button and the following screen will be displayed.

You can click on a status and the following screen will be displayed which will allow you to view and update the disaster plan status details. In our example we will select Behind Schedule.

Select Update Disaster Plan Status Information and a confirmation screen are displayed.
![]()
DELETING DISASTER PLAN STATUS
Should the organization wish to delete a disaster plan status, select Delete Disaster Plan Status From the main menu. Please note that you can only delete statuses that are not being referenced in the system.
Selecting Delete Disaster Plan Status will display the following screen.

You will be required to enter the status. You can use “*” for wildcard when searching. Once you have entered the status, you will click on the Delete Status Information button and the following screen will be displayed.

When you select a status from the screen above and the following screen is displayed.

To confirm the deletion of the disaster plan status, select YES. You will then receive a confirmation screen displayed below informing you that you have deleted the status.
![]()
DISASTER PLAN PRIORITY ADMINISTRATION
From the Disaster Plan Administration Main Menu, you can Add, Update and Delete Priority Information. Disaster Plan priorities are used when people report incidences to assist the organization in identifying incidences which will assist in determining which incidences require immediate attention.
ADDING DISASTER PLAN PRIORITIES
Clicking on the Add Disaster Plan Priority from the main menu will display this screen in which you would enter a priority and description information.

You will add a new priority and priority description.

Select Add Disaster Plan Priority Information and the following confirmation screen are displayed.
![]()
UPDATING DISASTER PLAN PRIORITIES
By clicking on the Update Disaster Plan Priority From the main menu, this screen will appear that displays the fields that can be used to search for priorities. There are two priorities that can not be updated which are High and critical priorities. The priorities are used when determining the email priority when sending out disaster plan information to appropriate personnel.

You will be required to enter the priority. You can use “*” for wildcard when searching. Once you have entered the priority, you will click on the Update Priority Information button and the following screen will be displayed.

You can click on a priority and the following screen will be displayed which will allow you to view and update the disaster plan priority details. In our example we will select Low.

Select Update Disaster Plan Priority Information and a confirmation screen are displayed.
![]()
DELETING DISASTER PLAN PRIORITIES
Should the organization wish to delete a disaster plan priority, select Delete Disaster Plan Priority From the main menu. Please note that you can only delete priorities that are not being referenced in the system. There are two priorities that can not be deleted which are High and critical priorities. The priorities are used when determining the email priority when sending out disaster plan information to appropriate personnel.
Selecting Delete Disaster Plan Priority will display the following screen.

You will be required to enter the priority. You can use “*” for wildcard when searching. Once you have entered the priority, you will click on the Delete Priority Information button and the following screen will be displayed.

When you select a priority from the screen above and the following screen is displayed.

To confirm the deletion of the disaster plan priorities, select YES. You will then receive a confirmation screen displayed below informing you that you have deleted the priority.
![]()
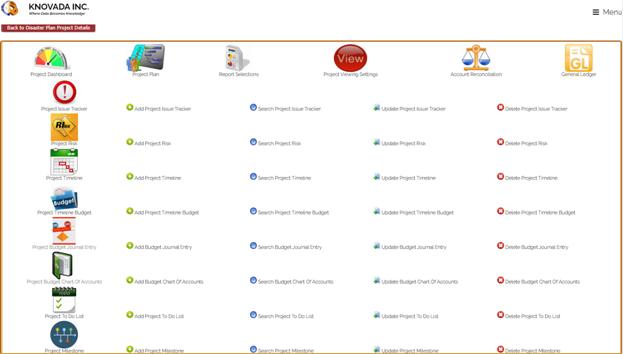
DISASTER PLAN ADMINISTRATION
From the Disaster Plan Administration Main Menu, you can Add, Update and Delete Information. Disaster Plans are used to manage various aspects of the disaster and to facilitate an effective and efficient methodology to address the disaster.
ADDING DISASTER PLANS
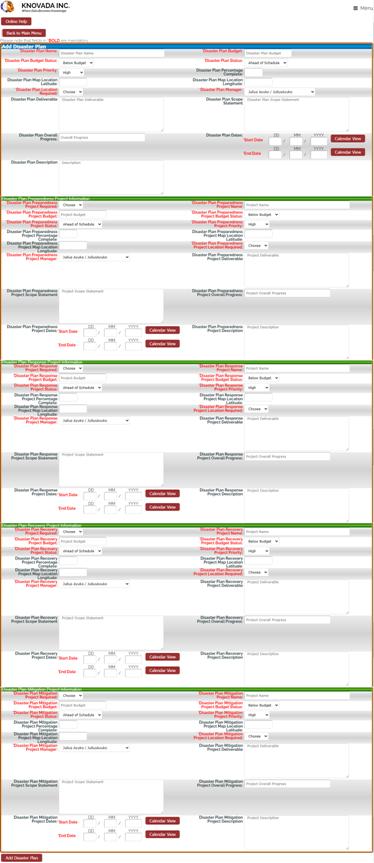
Clicking on the Add Disaster Plan from the main menu will display this screen in which you would enter disaster plan information and associated project information.
Select Add Disaster Plan and the following confirmation screen are displayed.
![]()
UPDATING DISASTER PLANS
By clicking on the Update Disaster Plan from the main menu, this screen will appear that displays the field that can be used to search for disaster plans.

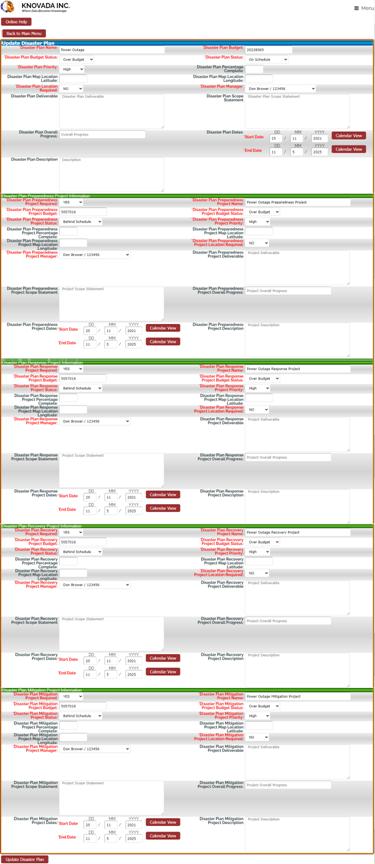
You will be required to enter the disaster plan. You can use “*” for wildcard when searching. Once you have entered the disaster plan, you will click on the Update Disaster Plan Information button and the following screen will be displayed.

You can click on a disaster plan and the following screen will be displayed which will allow you to view and update the disaster plan details. In our example we will select Power Outage.
Select Update Disaster Plan and a confirmation screen are displayed.
![]()
DELETING DISASTER PLANS
Should the organization wish to delete a disaster plan, select Delete Disaster Plan from the main menu.
Selecting Delete Disaster Plan will display the following screen.

You will be required to enter the disaster plan. You can use “*” for wildcard when searching. Once you have entered the disaster plan, you will click on the Delete Disaster Plan Information button and the following screen will be displayed.
When you select a disaster plan from the screen above and the following screen is displayed.

To confirm the deletion of the disaster plan, select YES. You will then receive a confirmation screen displayed below informing you that you have deleted the disaster plan.
![]()
VIEWING DISASTER PLAN DETAILS
From the disaster plan dashboard you can select click on a disaster plan to view the details and the following screen will be displayed.
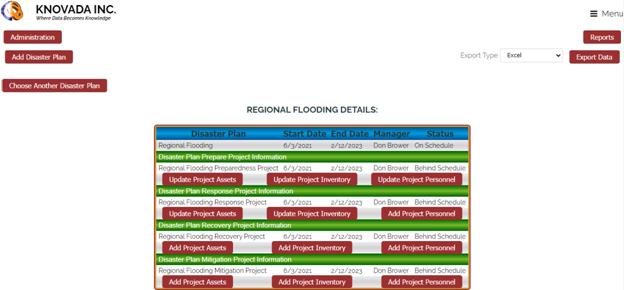
The disaster plan details screen provides you the ability to view the plan details and the associated disaster plan projects information. For each associated project you can add or update assets, inventory and key personnel that will be associated with the disaster plan project. To view additional details for the disaster plan you would click on the name of the disaster plan and the following screen would be displayed.
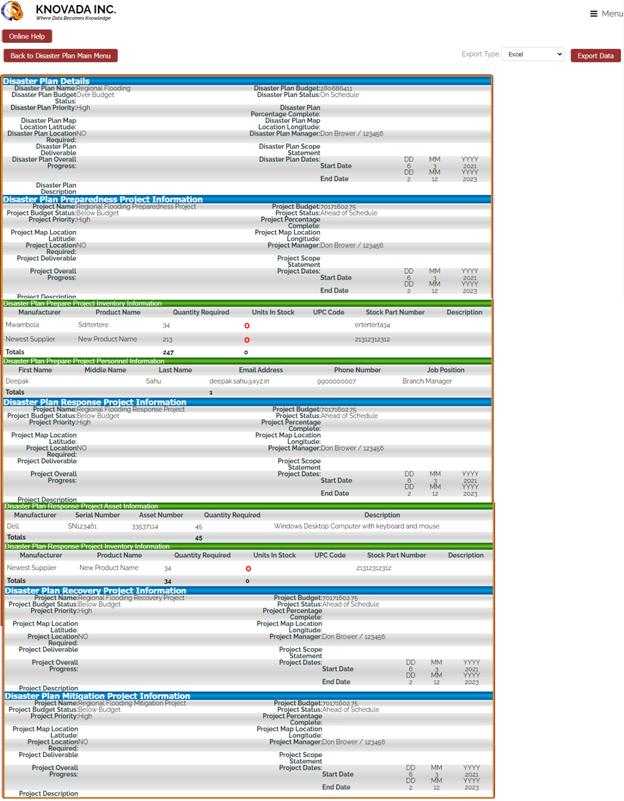
You will notice that in addition to the disaster plan details the project information is displayed as well. Additionally for each project if there are assets, inventory or key personnel associated with the project this information is displayed as well. This provides you will a detailed snapshot of the overall disaster plan details. Using the Export Data feature you can save this information in various formats. You can also click on the manufacturer of an asset or inventory to view the details regarding the asset or inventory. Additionally, if the inventory require quantity is greater than the quantity available it will be displayed in red. You can also click on the name of key personnel to view the employee details.
DISASTER PLAN PROJECT DETAILS
From the Disaster Plan details page you can click on the name of a project and the specific project details will be displayed. To view additional project details would click on the name of the project and the following screen would be displayed.
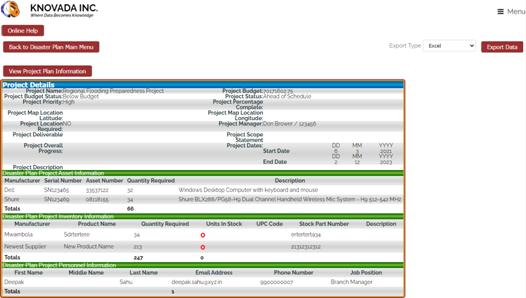
For each project if there are assets, inventory or key personnel associated with the project this information is displayed as well. This provides you will a detailed snapshot of the project details. Using the Export Data feature you can save this information in various formats. You can also click on the manufacturer of an asset or inventory to view the details regarding the asset or inventory. Additionally, if the inventory require quantity is greater than the quantity available it will be displayed in red. You can also click on the name of key personnel to view the employee details. From the project details page you can also click on the View Project Plan Information button and the following screen will be displayed.
The disaster plan project is integrated with the project management system which provides the ability to manage every facet of the project. For more information regarding the project management system please refer to the project management manual.
MANAGING DISASTER PLAN PROJECTS ASSETS
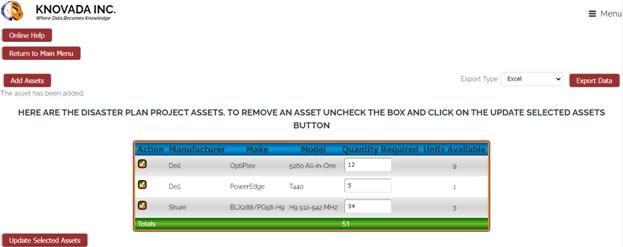
From the Disaster Plan details page you can click on the Update Project Assets button which will display the assets that are associated with the project. If you have not added any assets then the button would display Add Project Assets instead of Update Project Assets. By clicking on the Update Project Assets button the following screen will be displayed.
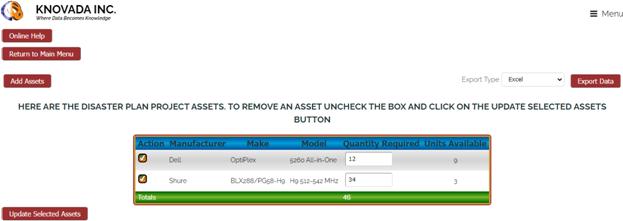
The system will display the assets that are currently associated with the project. You can also add additional assets to the project. If you want to remove an asset from the project you would uncheck the checkbox associated with the asset you want to remove and click on the update Selected Assets button. You can also change the required quantity by changing the number require and then clicking on the Update Selected Assets button. We will now discuss adding an asset, by clicking on the Add Asset but the following screen is displayed.
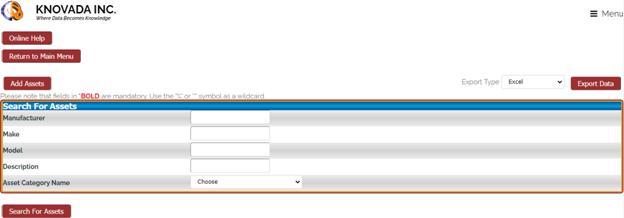
The first step in adding an asset is to search for the assets you want to add. You can enter in “*” for a wildcard when searching and you can also select an asset category to help narrow the search results. Once you have entered the search criteria, you will click on the Search For Assets button and the following screen will be displayed.
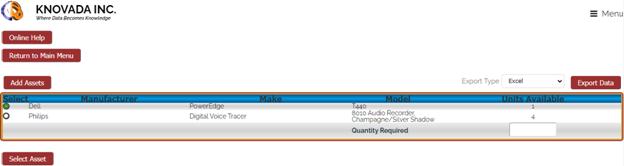
This screen allows you to select the asset and enter the required quantity that will be needed for the project. Only assets that are not already included in the project will be displayed. Once you have selected an asset and entered the required quantity you will click on the Select Asset button and the following screen will be displayed.
You will now notice that the computer that was selected and the quantity
require are now included in the assets for this project.
MANAGING DISASTER PLAN PROJECTS INVENTORY
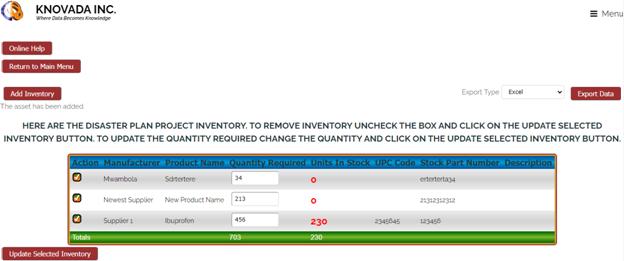
From the Disaster Plan details page you can click on the Update Project Inventory button which will display the inventory that is associated with the project. If you have not added any inventory then the button would display Add Project Inventory instead of Update Project Inventory. By clicking on the Update Project Inventory button the following screen will be displayed.
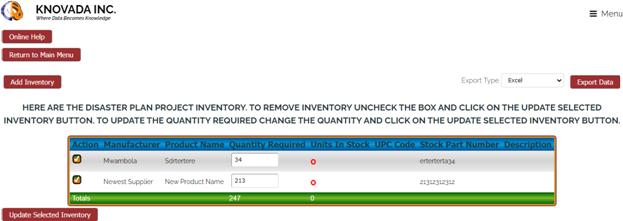
The system will display the Inventory that is currently associated with the project. You can also add additional Inventory to the project. If you want to remove an inventory from the project you would uncheck the checkbox associated with the inventory you want to remove and click on the Update Selected Inventory button. You can also change the required quantity by changing the number require and then clicking on the Update Selected Inventory button. We will now discuss adding an inventory, by clicking on the Add Inventory but the following screen is displayed.
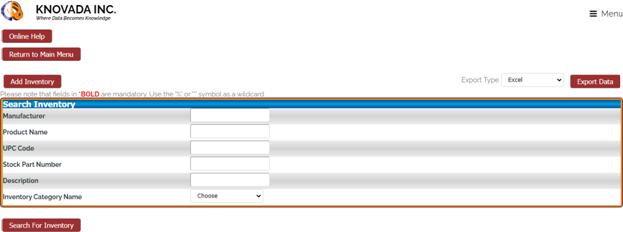
The first step in adding an inventory is to search for the inventory you want to add. You can enter in “*” for a wildcard when searching and you can also select an inventory category to help narrow the search results. Once you have entered the search criteria, you will click on the Search For Inventory button and the following screen will be displayed.
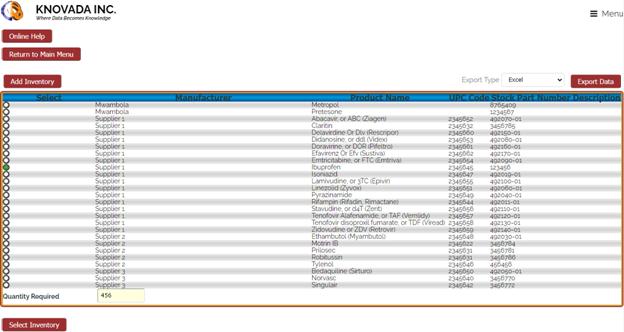
This screen allows you to select the inventory and enter the required quantity that will be needed for the project. Once you have selected an inventory and entered the required quantity you will click on the Select Inventory button and the following screen will be displayed.
You will now notice that the computer that was selected and the quantity
require are now included in the Inventory for this project.
MANAGING DISASTER PLAN PROJECTS KEY PERSONNEL
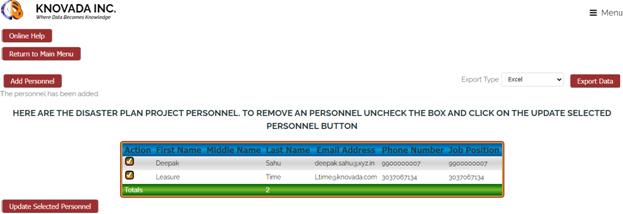
From the Disaster Plan details page you can click on the Update Project Personnel button which will display the personnel that is associated with the project. If you have not added any personnel then the button would display Add Project Personnel instead of Update Project Personnel. By clicking on the Update Project Personnel button the following screen will be displayed.
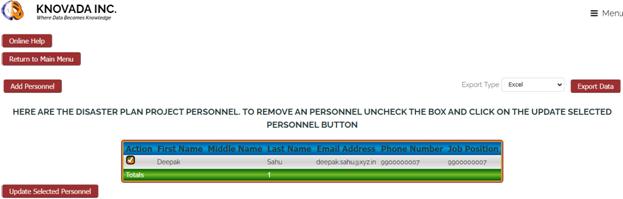
The system will display the key personnel that are currently associated with the project. You can also add additional personnel to the project. If you want to remove personnel from the project you would uncheck the checkbox associated with the personnel you want to remove and click on the Update Selected Personnel button. We will now discuss adding personnel, by clicking on the Add Personnel but the following screen is displayed.
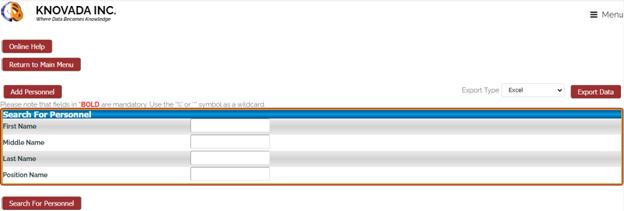
The first step in adding personnel is to search for the personnel you want to add. You can enter in “*” for a wildcard when searching. Once you have entered the search criteria, you will click on the Search For Personnel button and the following screen will be displayed.
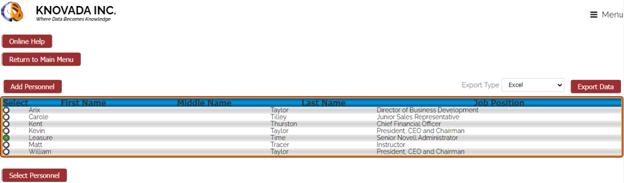
This screen allows you to select the personnel that will be needed for the project. Once you have selected a person you will click on the Select Personnel button and the following screen will be displayed.
You will now notice that the person that was selected are now included in the
personnel for this project.
You can repeat this process to add assets, inventory, and personnel for each project associated with the disaster plan.